Pin It
 My niece called me three weeks before graduation with one request: cupcakes with tiny graduation caps on top. I laughed at first, imagining how fiddly that would be, but then I realized she wasn't asking for complicated—she wanted something that felt celebratory and a little bit playful. That afternoon, I started experimenting with candy pieces and melted chocolate, discovering that the simplest toppers often make the biggest impression. These cupcakes became my answer to her vision, and now they're the ones I make whenever someone deserves to feel like they've accomplished something real.
I made these for my best friend's daughter's grad party last summer, and watching her face when she saw her cupcake topped with that tiny edible cap was worth every minute of preparation. She grabbed one immediately and didn't even bother with a plate, just stood there eating it straight from her hand and grinning. That's when I knew these weren't just cupcakes—they were a small, sweet way to mark a moment that felt genuinely important.
Ingredients
- All-purpose flour: This is your structure—it keeps the cupcakes tender but sturdy enough to hold a frosting swirl and a candy topper without toppling.
- Granulated sugar: Creamed with butter, it aerates the batter and creates that light, moist crumb that makes people come back for seconds.
- Unsalted butter: Use it softened and at room temperature, never cold—cold butter won't cream properly and you'll end up with dense cupcakes.
- Eggs: Room temperature eggs incorporate smoothly into the batter and help bind everything together into a cohesive structure.
- Whole milk: This adds moisture without making the cupcakes gummy, and it keeps them tender even if they sit for a day or two.
- Baking powder: Make sure it's fresh and active—stale baking powder won't give you the rise you need for fluffy cupcakes.
- Vanilla extract: Pure vanilla, not imitation, brings a subtle warmth that rounds out the sweetness.
- Powdered sugar for frosting: Always sift it first to break up the lumps, otherwise you'll have grainy frosting no matter how long you beat it.
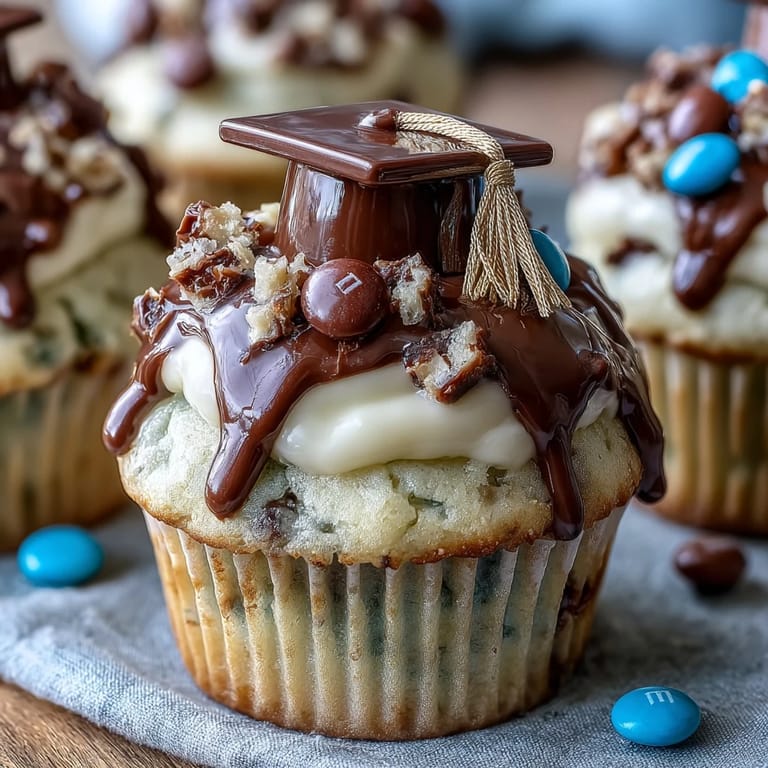
- Mini peanut butter cups: These form the base of your graduation cap, nestled upside-down into the center of a chocolate square.
- Chocolate square candies: These are your cap's flat mortarboard—choose good quality ones so they taste as good as they look.
- String licorice or sour candy strips: These become your tassel, and they add a playful texture contrast to the chocolate and frosting.
- Mini M&Ms or candy pearls: These sit at the tassel junction like a tiny button, the final detail that makes the cap feel complete.
Tired of Takeout? 🥡
Get 10 meals you can make faster than delivery arrives. Seriously.
One email. No spam. Unsubscribe anytime.
Instructions
- Get Your Mise en Place Ready:
- Preheat the oven to 350°F and line your muffin tin with paper liners—this takes just a few minutes but makes cleanup so much easier. Have all your ingredients measured and ready before you start mixing, because the batter comes together quickly and you don't want to scramble.
- Cream the Butter and Sugar:
- In a large bowl, beat the softened butter and sugar together for about two to three minutes until it's pale and fluffy, which means you've beaten enough air into it. This step is crucial because it's what makes the cupcakes light rather than dense.
- Add the Eggs and Vanilla:
- Beat in one egg at a time, letting each one fully incorporate before adding the next, then stir in the vanilla extract. The mixture should look creamy and slightly thick, not separated or curdled.
- Combine Dry Ingredients:
- In a separate bowl, whisk together the flour, baking powder, and salt so the leavening distributes evenly. This prevents pockets of baking powder from creating bitter-tasting spots in your cupcakes.
- Build the Batter in Stages:
- Add half the dry mixture to the butter mixture and stir until barely combined, then pour in the milk, then add the remaining dry ingredients and mix just until you don't see any streaks of flour. Overmixing develops gluten and makes cupcakes tough, so stop as soon as everything comes together.
- Fill and Bake:
- Divide the batter evenly among the liners—an ice cream scoop works perfectly for this—and bake for eighteen to twenty minutes until a toothpick inserted in the center comes out clean or with just a few moist crumbs. The cupcakes will smell like vanilla and butter when they're done, and they should spring back when you lightly touch the top.
- Cool Completely:
- Let the cupcakes cool in the tin for about five minutes, then transfer them to a wire rack and let them cool all the way to room temperature before frosting. Frosting warm cupcakes makes the frosting melt and slide right off.
- Make the Buttercream Frosting:
- Beat the softened butter until it's smooth and creamy, then gradually add the powdered sugar a little at a time, scraping down the bowl as you go. Add the milk, vanilla, and salt, then beat for another minute or two until the frosting is fluffy and spreadable.
- Frost the Cupcakes:
- Swirl or spread a generous dollop of buttercream onto each cooled cupcake—thick enough to hold a topper but not so thick you can't taste the cake. If your frosting is too soft, chill it for ten minutes before frosting.
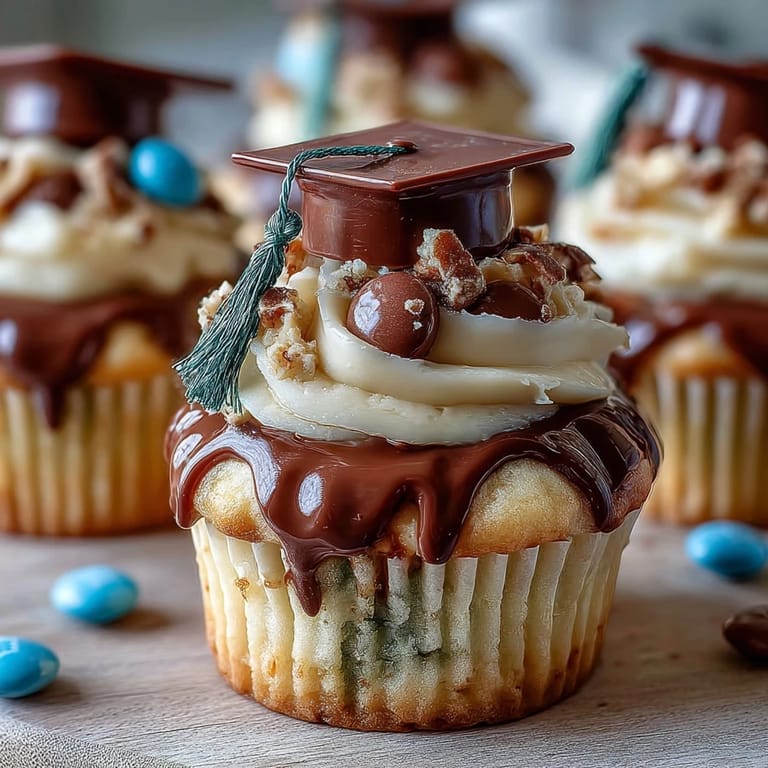
- Assemble the Graduation Caps:
- This is the fun part and it's easier than it looks—place a chocolate square flat-side up, then attach a mini peanut butter cup upside-down in the center using a tiny dab of melted chocolate or frosting as glue. Add a piece of licorice as the tassel coming off one corner and glue a mini M&M or pearl at the tassel junction as the button, then let everything set for a few minutes before placing the cap on a frosted cupcake.
 Pin It
 There's something about these cupcakes that goes beyond dessert—they're little edible congratulations, a way of saying I see you and what you've done matters. Every time I've made them, the reaction is the same: someone picks one up, laughs at the adorable cap, takes a bite, and suddenly the moment feels more real and more celebratory.
The Secret to Light and Tender Cupcakes
The magic happens in the creaming step at the very beginning, when you beat butter and sugar together until pale and fluffy. That's when tiny air bubbles get incorporated into the fat, and those bubbles expand in the oven's heat, creating the light, tender crumb that makes people reach for a second cupcake. I learned this the hard way after making dense, heavy cupcakes for years—I was too impatient with the creaming step. Now I set a timer and commit to it, and the difference is noticeable every single time.
Making the Toppers Look Like Real Graduation Caps
The trick is understanding that a real graduation cap is basically a square mortarboard with a tassel hanging from the corner, so you're replicating that shape with candy. The chocolate square becomes the mortarboard, the peanut butter cup is the raised center detail, the licorice is the tassel, and the M&M is the button where the tassel attaches. Once you see it that way, assembling them becomes intuitive and even enjoyable—you're basically building tiny edible art projects.
Storage and Serving Tips
These cupcakes stay fresh and moist at room temperature for up to two days in an airtight container, which is perfect if you're making them a day ahead for a party. If you need to store them longer, you can freeze the unfrosted cupcakes for up to three weeks and thaw them at room temperature, then frost and decorate them closer to serving time.
- The buttercream frosting also freezes well separately, so you can make it days in advance and just thaw and re-whip it before using.
- If you're making these for a party, assemble the candy caps an hour or two before guests arrive so they're fresh and the licorice hasn't started to soften.
- School colors can be mixed into the frosting using food coloring, turning each cupcake into a personalized tribute to the graduate.
 Pin It
 These cupcakes remind me that celebration doesn't have to be complicated to feel meaningful. They're just vanilla cake and buttercream and candy, but somehow they say everything that needs saying on a graduation day.
Recipe FAQs
- → What ingredients create the cupcake base?
The base combines all-purpose flour, sugar, butter, eggs, milk, baking powder, salt, and vanilla extract for a moist and tender texture.
- → How is the buttercream frosting prepared?
Softened butter is whipped until smooth, then powdered sugar, milk, vanilla extract, and a pinch of salt are gradually added to create a fluffy frosting.
- → What components make up the graduation cap toppers?
Mini peanut butter cups or chocolate squares form the cap base, licorice or sour candy strips act as tassels, and mini M&Ms or candy pearls serve as buttons, all assembled with melted chocolate or frosting.
- → Are there nut-free options for the toppings?
Yes, using chocolate square candies instead of peanut butter cups ensures the toppers are safe for nut allergies.
- → How long do the cupcakes stay fresh?
Store cupcakes in an airtight container at room temperature for up to two days to maintain freshness.
- → Can frosting colors be customized?
Food coloring can be added to the buttercream frosting to match school or party colors.