 Pin It
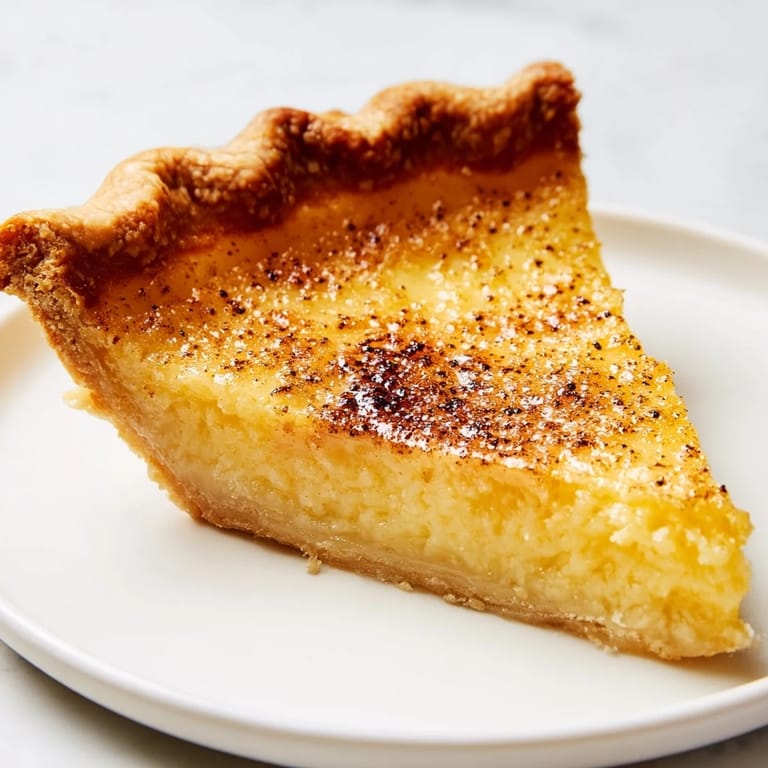
 My grandmother always had a buttermilk pie waiting on the kitchen counter after church on Sundays, and I spent years thinking it was some complicated magic. The filling would shimmer like custard, the top would be perfectly golden, and somehow it tasted like summer even in the dead of winter. When I finally asked for the recipe, I was shocked at how simple it was—just buttermilk, eggs, and a few pantry staples that somehow transformed into something transcendent. Now I make this pie whenever I need to remember that the best things in life don't require a long ingredient list or fancy techniques.
I learned to make this pie properly when a friend showed up unannounced on a Tuesday afternoon, and instead of panicking about having nothing impressive to serve, I remembered my grandmother's recipe and threw one together. By the time they left three hours later, we'd eaten half the pie while sitting on the porch, talking about everything from college to career disasters to dreams we'd forgotten we had. That pie became less about being a show-stopper dessert and more about creating a moment where showing up mattered more than perfection.
Ingredients
- 1 unbaked 9-inch pie crust: Use homemade if you're feeling ambitious, but honestly, a quality frozen crust works beautifully and no one will know the difference—I've tested this theory many times.
- 1½ cups granulated sugar: This is the sweetness backbone, and it works with the buttermilk to create that signature tangy-sweet balance that makes people ask for the recipe.
- 3 tablespoons all-purpose flour: This small amount helps thicken the filling just enough so it sets beautifully without turning rubbery.
- ½ cup unsalted butter, melted and cooled: Let it cool slightly after melting so it doesn't scramble the eggs when combined—a lesson learned the messy way.
- 3 large eggs: Room temperature eggs incorporate more smoothly, but if you forget and use cold ones, just whisk a little longer and you'll be fine.
- 1 cup buttermilk: This is the soul of the pie, giving it that distinctive tangy flavor that makes people taste it twice to figure out what they're tasting.
- 1 tablespoon lemon juice: Brightens the filling and adds complexity, but you can push this to 2 tablespoons if you like living on the edge.
- 1 teaspoon vanilla extract: A small touch that rounds out the flavor without announcing itself.
- ¼ teaspoon ground nutmeg and ¼ teaspoon salt: These tiny amounts are the secret players—nutmeg adds warmth, salt makes everything taste more like itself.
Tired of Takeout? 🥡
Get 10 meals you can make faster than delivery arrives. Seriously.
One email. No spam. Unsubscribe anytime.
Instructions
- Get your oven ready and crust settled:
- Preheat the oven to 350°F while you settle your pie crust into the dish, crimping the edges however feels natural to your hands. If you want perfectly crimped edges, go for it; if you prefer a rustic look, that's equally beautiful and arguably easier.
- Build the sweetness foundation:
- Whisk the sugar and flour together in a large bowl until they look unified and there are no flour streaks. This step is almost meditative—just whisking sugar and flour together while your kitchen starts smelling like what's about to happen.
- Bring the butter into the mix:
- Pour in your cooled melted butter and stir until the mixture looks like damp sand, creamy and combined. Don't overthink this step; a minute or two of stirring is all you need.
- Introduce the eggs one at a time:
- Add one egg, whisk it smooth, then add the next, making sure each one is fully incorporated before the next arrives. This takes maybe three minutes total and makes a real difference in the texture—it's one of those small steps that actually matters.
- Finish the filling with flavor:
- Stir in the buttermilk, lemon juice, vanilla extract, nutmeg, and salt until everything is fully combined and the mixture looks silky. Take a moment to smell it at this point—that smell is your assurance that something good is about to happen.
- Pour and bake:
- Carefully pour the filling into your crust and slide it into the oven, then set a timer for 40 minutes and try not to open the door obsessively. Around the 35-minute mark, the kitchen will smell incredible, and that's when the real magic starts.
- Know when it's done:
- The pie is ready when the center has a slight jiggle but doesn't look raw, and the top is golden brown. If you have a pie shield, use it to prevent over-browning; if not, loosely tent it with foil for the last 10 minutes if needed.
- Cool with patience:
- Let it cool completely on a wire rack, which takes a couple of hours but creates that perfect set. I know waiting is hard, but this step ensures clean slices instead of a filling-covered mess.
 Pin It
 The first time someone tasted my buttermilk pie, they went quiet for a moment before saying, "This tastes like home," and I realized that's exactly what it's supposed to taste like—not someone else's home, but a home that feels warm and familiar whether you've ever had it before or not. That's when this simple pie stopped being just a recipe and became something I make whenever anyone needs reminding that the best things don't have to be complicated.
The Secret Magic of Buttermilk
Buttermilk sounds intimidating if you've never used it before, but it's truly just tangy milk, and it transforms this pie from a regular custard into something with actual personality. The acidity plays against the sweetness in a way that feels sophisticated without being pretentious, and it keeps the texture from becoming heavy or dense. I used to buy buttermilk just for this pie, but now I always keep it on hand because it sneaks into other baking projects and makes everything taste a little more interesting.
Customizing Your Version
One of the best things about this pie is how willing it is to bend to your preferences without losing its identity. The lemon juice can be amped up to 2 tablespoons if you want a brighter, tangier result, and some people swear by adding an extra ¼ teaspoon of nutmeg sprinkled on top before baking for aroma that fills the whole house. You can also experiment with the vanilla—use almond extract instead if you want something more delicate, or skip it entirely and let the buttermilk be the only flavor speaking.
Serving and Storing Your Pie
This pie is honestly perfect on its own, but if you want to dress it up, a dollop of whipped cream or a handful of fresh berries are both excellent choices that don't overpower the delicate filling. Leftovers keep beautifully in the refrigerator for up to three days, and it actually tastes good cold straight from the fridge if you're the kind of person who sneaks dessert before breakfast.
- Whipped cream made fresh is nice, but even store-bought works if you're being practical about it.
- Room temperature brings out the flavor better than cold, so let it sit on the counter for 15 minutes before serving if you have the time.
- This pie travels well if you need to bring it somewhere, though it's best served the day of for the prettiest presentation.
 Pin It
 This pie has become my answer to the question of what to make when I want to feed people something that feels like love but doesn't require me to stress. Every time I make it, I think of my grandmother standing at her kitchen counter on Sunday mornings, and I feel a little closer to understanding why she always seemed so calm.
Recipe FAQs
- → What gives the custard its tangy flavor?
Buttermilk and lemon juice combine to provide the characteristic tangy taste in the custard, balancing the sweetness.
- → Can I use a store-bought crust?
Yes, a store-bought 9-inch unbaked pie crust works well, saving time without compromising flavor.
- → How do I know when the filling is set?
The custard is done when the center is firm but slightly jiggly, with a lightly golden top after baking 40–50 minutes.
- → Are there any suggested garnishes?
A sprinkle of nutmeg before baking or topping with whipped cream and fresh berries enhances aroma and presentation.
- → How should leftovers be stored?
Store leftovers covered in the refrigerator for up to three days to maintain freshness and texture.